Minlib Tutorial
As with any piece of unfamiliar software, it takes some time to get used to minlib. However, despite its power as a library management program, it's pretty simple to operate, and it won't take very long to be using it with ease.
To get started, you'll need to have at your disposal a command line. While minlib doesn't require you to work with it on the command line (that's what its text user interface, or TUI, is for), the command line is the normal way to start it up. We will use
$>to show the command prompt, and the following line (if any) will be the output that minlib produces. You are supposed to type what appears on the line after the prompt.
Getting Started
To get started using minlib, you'll really only need one thing: a data file. This is the file that minlib uses to form its list of your library, making all the useful features of minlib possible. It's so important, in fact, that minlib is entirely useless without one, and will simply complain that you haven't given it anything to work with and quit:
$>  minlib
minlib:  error:  no input file was specified
Not very useful; and minlib strives to be useful. So you need to give minlib something to work with; you need to give it your data file. You can do this in two ways:
- By using the -f option on
the command line when you start minlib:
$> minlib -f myfilename
This will instruct minlib to use myfilename for input. - By putting a DATAFILE in your config file. We will learn about config files and their options in a bit.
If you combine these, minlib will use both; that is, both the files specified by DATAFILE: and the files specified by -f
You can specify both -f and DATAFILE multiple times, with one file name each time; minlib will use all the files you give it, combining them seamlessly into one large library for you to view, search, and otherwise work with.
Of course, first you have to create your input file, which you can do manually; however, minlib provides a mechanism to short-circuit that. Let's take a common use case: you're trying to convert your library over from calibre. Unlike calibre, minlib does not force you to store your files in a particular way; so converting your calibre use to minlib is a simple matter: use the -a option. Take note of whatever directory you told calibre to use for storing your books. Then enter the following:
$>  minlib -a /your/book/directory > library_file
metadata.db not a minlib format; skipping...
Processing mybook.pdf...
Processing mybook.epub...
Processing mybook_1.html...
Processing mybook_2.html...
Processing mybook_3.html...
....
And so on. Depending on the size of your library, this may take a while to run; but minlib will provide you plenty of output to let you know what it's doing. All of that feedback about what minlib is doing will be output to "stderr," so you'll be able to watch what minlib is doing; but the actual metadata from your files is written to "stdout," so once minlib is finished, you'll find your data file in library_file.
If you open library_file, it will look something like this:
%%
TITLE:	Lawrence Lessig: - Free Culture - How Big Media Uses Technology and the Law to Lock Down Culture and Control Creativity
SUBJECT:	law
KEYWORDS:	law
AUTHOR:	LM-sisu-scribe
CREATOR:	LaTeX with hyperref package
PRODUCER:	xdvipdfmx (0.7.8)
CREATIONDATE:	Fri Mar 11 09:41:37 2011
TAGGED:	no
ENCRYPTED:	no
PAGESIZE:	612 x 792 pts (letter)
PAGEROT:	0
PDFVERSION:	1.4
PATH:	/your/book/directory/lessig_free_culture.pdf
%%
TITLE:	Choregraphie, ou, L'art de décrire la dance, par caracteres, ...
KEYWORDS:	http://www.archive.org/details/choregraphieoula00feui
AUTHOR:	Feuillet, Raoul-Auger, 1659 or 60-1710
CREATOR:	Digitized by the Internet Archive
PRODUCER:	Recoded by LuraDocument PDF v2.28
CREATIONDATE:	Sat Mar 20 01:00:45 2010
MODDATE:	Sat Mar 20 01:22:31 2010
TAGGED:	no
ENCRYPTED:	no
PAGESIZE:	350 x 498 pts
PAGEROT:	0
PDFVERSION:	1.5
PATH:	/your/book/directory/choregraphieoula00feui.pdf
....
Depicted above are two records, each of which lists the metadata for one book. All of this information, except the line labelled "PATH", comes directly from the files themselves; the PATH line is supplied by minlib. Of course, minlib will traverse the entire directory tree and do this for all the files in formats it recognizes; other files it will simply ignore.
Each record is separated from the ones above and below it by a line containing %%; even the first record must begin with this line, but the last record does not need to be followed by it. Each line consists of a field name, which is a series of all-caps (and optionally periods) closed by a colon, followed by either nothing or any amount of whitespace, followed by the field data, which is arbitrary information which consists of the rest of the line. The field data can be of any length; our second record shows an abnormally long title (beginning with "Choregraphie"), but the field data has no length limit at all.
In any case, now you have your data file (at least one; it's likely you'll wind up with several as time goes on, each containing different types of media; but you may choose to keep them all in one, if you wish).
(Added files to your library directories? No problem; run the same command, but with -A rather than -a. This will skip any file that is already in your database, printing a message to tell you which file it's skipping and why. That way you can run minlib over the same directory multiple times as you add files, without worrying about your database getting polluted with duplicates. Just remember to send the output to your library file with >>, not >, so you keep what you've already got—or better yet, send it to a different file, and add it to your library file after checking it.)
Now try running:
$> minlib -f library_file
minlib will look for library_file first in the default config directory, which is $HOME/.config/minlib/. If it can't find library_file there, it will look in the current working directory. If it can't find it there, it will assume that you've given it an absolute path and check there. If it still can't find the file, it will complain and do its best to run, but if it has no data it will quit.
We'll see what happens then in our next section.
Running Minlib
Having run the last-listed command above, minlib will start itself up and show you the listings of your library. By default, it looks something like this:
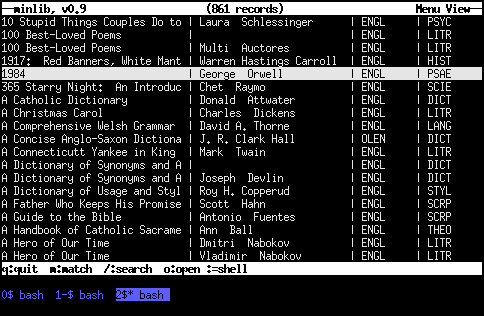
(We say "by default" because the colors and format are extremely customizable, about which we'll see more later. But the above is what minlib does unless you tell it to do otherwise.)
Let's look at that image above for a moment. The line at the very bottom, with blue text, is immaterial; it is simply a function of the author's totally unrelated configuration of GNU screen. But we can see several important parts of the screen that minlib presents to you above, each of which serves a different function.
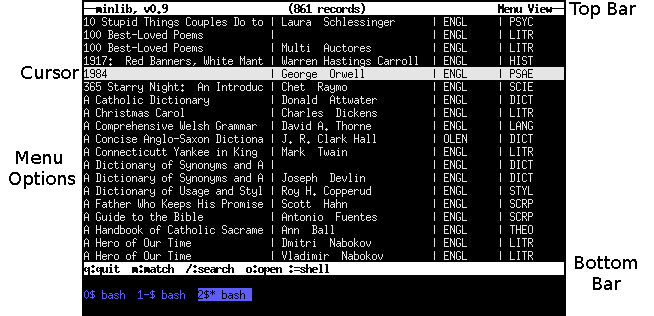
The top bar provides you the name and version of the program; the total number of records that minlib currently has loaded; and identifies that you are in menu view (as opposed to detail view, which is reached by hitting "enter" on one of the menu options). The bottom bar lists your options for actions, and is relatively self-explanatory. Then there are the menu options, which is the list of records in your library; scroll up or down to see more. Finally, there is the cursor, which highlights the currently-selected item; in this case, Orwell's 1984.
Finally, there is the line just below the bottom bar, which prints messages for the user. Most of the time it will be empty; however, it will often contain important information for the user. We will call this the status line.
You can move around in menu view in the following ways:
- Scroll up and down: use either your up and down arrow keys, or use 'j' for down and 'k' for up.
- Page up and down: use the "Page Up" (or '-') and "Page Down" (space) keys to scroll up and down by a page at a time.
- Menu up and down: you can skip straight to the top or bottom of the menu view by using the "Home" and "End" keys on your keyboard. Due to some strange keyboard shenanigans, these buttons do not always work; hitting 'F' (capitalized) and 'L' (capitalized) will always work.
- Match: you can do a quick and simple matching of records. In the default view, for example, you can find 1984 easily by simply typing 'm', then entering the first few characters in the title. There may be more than one match; if that's so, use 'p' to find the next match, or 'P' (capital 'p') to find the previous one. The status line will print whether a match was found or not.
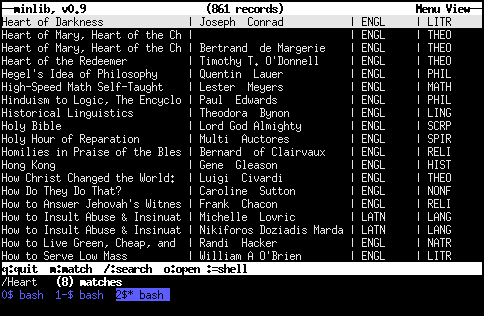
- Search: you can do full record searches of your entire library. Hit '/' (forward slash), then type in the text you want to find. You can enter any POSIX-compliant regular expression here; if you don't know what that means, don't worry about it, and just know that you can match text anywhere in the library. There may be more than one match; if that's so, use 'n' to find the next match, or 'N' (capital 'n') to find the previous one. The status line will print whether a match was found, and if so, how many. It will also inform you if there was an error in the regular expression you entered, if any.
- Field search: you can search any individual
field in your library. Hit '/' (forward slash), then
tell minlib which field you'd like to search by enclosing
a single-letter indicator in tildes. E.g.: "/~a~Mac" will
search for the pattern "Mac" in the AUTHOR fields. The
letter codes are identical to those for formatting strings:
Do not put spaces in the query string; it should be exactly like this: "/~t~Lilies" to search all titles for the pattern "Lilies".Sequence Field Heading ~t~ TITLE ~a~ AUTHOR, ARTIST ~L~ AUTHLAST ~M~ AUTHMID ~F~ AUTHFIRST ~p~ PUBLISHER ~k~ KEYWORDS ~S~ SUBJECT ~l~ LANG, LANGUAGE, LANGONE ~s~ LANGTWO ~g~ GENRE, TYPE ~y~ YEAR ~D~ DATE ~m~ MEDIUM ~P~ PLACE, LOCATION ~e~ EDITOR ~T~ TRANSLATOR or TRANS ~d~ DIRECTOR ~i~ ILLUS.OR
So consider the following screen:
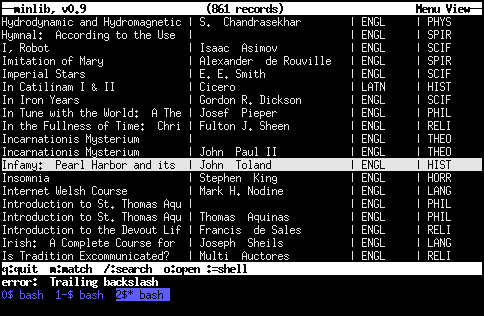
Note the status line; it reads "error: Trailing backslash". This indicates that the user tried to search with a regular expression, but he accidentally left a trailing backslash, which caused an error. He should try again. The status line can also contain more pleasant information:
If you find a work you're interested in viewing more information about, you should go to its detail view; this is done simply by hitting the "enter" key when you have your cursor on the record you want. You will be faced with something like this:
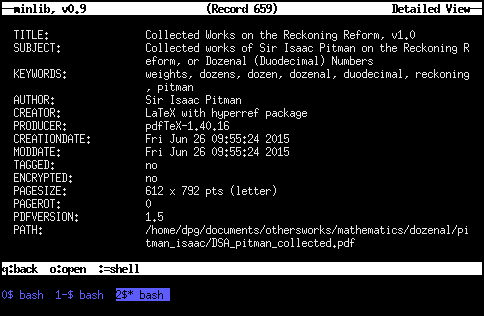
As noted above, all of this information except for the "PATH" field was derived automatically from the pdf file; the PATH field was added by minlib. We can see a few things about detail view from this screenshot:
- Word wrapping is basic and naïve; lines are wrapped simply at whatever character happens to fall at the end of the line.
- Sometimes the metadata will exceed the available space on the screen. No worries; scroll down with the down-arrow key or 'j'; scroll up with the up-arrow key or 'k', just as you do in menu view.
- A record number is centered at the top of the screen. This is the record number as it appears in your data file; it is not the order in which tye appear in menu view.
In detail view, there are some additional options: cover, open, send, and shell. Hit 'o' to open; the bottom bar will then tell you to enter the number of the PATH you want to open and hit enter. (Each PATH will be printed, in the detail view, with a corresponding number). Once you've done this, minlib will do its best to open the file; if it can't figure out how to do so, it will tell you so. It will also tell you if you've entered a number for a PATH which it doesn't know.
Incidentally, you can also use the word "COVER" rather than "PATH"; this will be treated in the same way, but it makes clear that what you're working with is the cover of a book, album, or movie, rather than the file itself. COVERs will be numbered along with PATHs and are manipulated in the same way.
Hit 'c' to open the cover of the book, if you've defined one with COVER in the data file. If you have, it will be opened; if you haven't, or if minlib is for some reason unable to open it, minlib will tell you so. You can still open your COVER with the usual 'o' method, as well, just be entering its number and hitting enter; COVERs are numbered along with the PATHs. This is purely a shortcut to get the cover file up on your screen.
Hit 's' for send. This will then open the bottom-bar menu asking you to hit the number of the PATH you'd like to attach. Once you select one, that file will be attached to an email, which you will be asked to compose. Enter the address you'd like to email the file to, optionally include a subject and a body, and then send.
Mailing will include at least the file you're asking minlib to send; it may also include the metadata about that file that you have entered in your data file. See the information about the DEF_MAIL_SENDER string, below, for how to make this happen.
Hit ':' for the shell. This will call the default shell on your system, as expressed by the environment variable "SHELL"; if this does not exist, it simply calls the POSIX shell, "/bin/sh". This is especially useful in two primary cases:
- You have a file in a record which is in a format which
minlib doesn't know. By pulling that record up in detail
view, you can have the path to the file displayed on your
screen, then shell out with ':' and open it with the
application of your choice from there. This is also useful
for opening files in a different application than normal.
Perhaps your default pdf viewer is xpdf, but you'd like to
open this particular file in okular. Shell out with ':',
type "okular" followed by the name of the file, and put it
in the background by closing your command with "&".
E.g.:
: $> okular /your/library/directory/great_file.pdf &
- You want to convert your file to another format.
Minlib does one thing---manage your digital library---and
does it well. It's not a file-format converter, and it
doesn't want to be; but it does want to make it easy for you
to run one. Say you have an old Postscript file you want to
convert to pdf. Minlib doesn't do this for you (and it
shouldn't; that's not what minlib is), but you can still do
it easily:
: $> ps2pdf /your/library/directory/old_file.ps
And it's converted. You can add the new file to your database as a new record by itself:: $> minlib -a /your/library/directory/old_file.pdf >> library_file
(Make sure you use two ">", not one, or it will overwrite your library file! Two will simply append it to the end.) Or you can edit your library file and add an extra path command to that record.
Hit 'r' to reload. In menu view only, there is the option to reload your data file, by pressing 'r'. Perhaps you've been working on a record, converted an old Postscript file to a pdf, and have then shelled out to add that data to your data file. While it's in your data file, minlib still doesn't know about it; minlib loaded your data file when you started the program. So hit 'r' to reload the file. This literally simply reruns the program with the exact same command line you used to start it, so it will result in you having your program up and just as it was before, except for the changes you made to your data file.
minlib will also very conveniently simply list all the files that your database contains, if you provide it the -P option:
$> minlib -P
This is a very convenient way of getting all your files together for, say, tarballing a backup together, or transferring all your files to another device such as an ereader.
-P has the added benefit that it will tell you, via an error message, if the file you have in your database doesn't exist. Perhaps you mistyped it, or moved your file, or changed its name, or whatever. Now you know that you need to fix it in your database, too.
And that's more or less all there is to running minlib. Now let's look at some of the ways you can control the way minlib looks and behaves.
Configuring Minlib
When you start minlib, it goes out hunting for an rc file, also called a config file. By default, that file is $HOME/.config/minlib/minlibrc, but it can be anywhere; just let minlib know with the -c command line option:
$> minlib -c rcfile -f library_file
If you give minlib a config file on the command line in this way, minlib will respect that file and ignore $HOME/.config/minlib/minlibrc, even if it exists. minlib will look for config files in the same locations as it looks for data files (see above). If you neither give minlib a config file on the command line nor have a $HOME/.config/minlib/minlibrc, minlib will simply start with default options, which we saw above. (You can also force minlib to start with the default options by giving it a config file name of "-"; e.g., -c"-".)
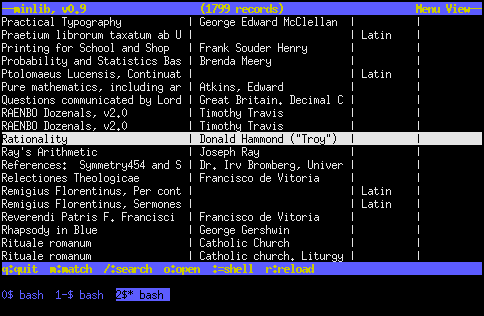
You can customize minlib's formatting of your records, the colors of the different parts of the screen, and the programs that minlib will call when you ask it to open a file. This can produce nice-looking, sober examples:
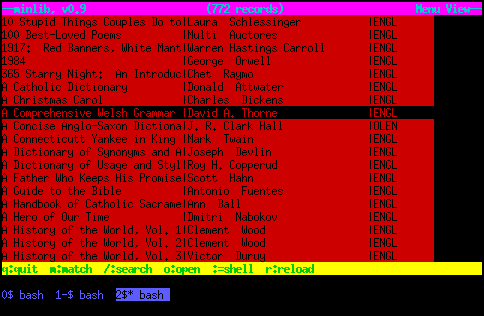
Or some true monstrosities:
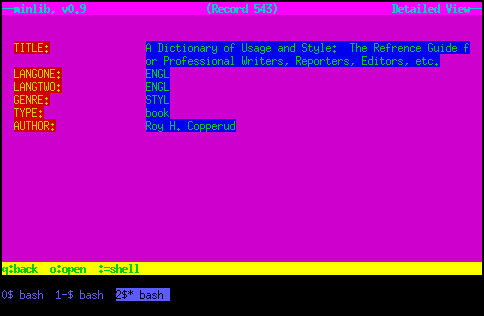
How you do it is up to you; the sky's the limit.
All minlib configuration options are of the same format: a configuration option in all caps, followed by a colon, followed by an arbitrary amount (or lack) of whitespace, followed by the option text. E.g.:
TOP_FORE_COLOR:  COLOR_YELLOW
TOP_BACK_COLOR:  COLOR_BLUE
DEF_PDF_VIEWER:	xpdf "%s"
Couldn't be simpler. Now, on to the actual configuration options!
Color Configurations
We saw above what we call the various parts of the minlib screen; each of those parts is colored by a separate color pair, the first color of which forms the foreground (the color of the text), and the second color of which forms the background. Minlib accepts standard ncurses colors; these are entered in all-caps and consist of COLOR_BLACK, COLOR_RED, COLOR_GREEN, COLOR_YELLOW, COLOR_BLUE, COLOR_MAGENTA, COLOR_CYAN, or COLOR_WHITE. They can be assigned to the various parts of the minlib screen as follows:
| Field | Description | Default |
|---|---|---|
| TOP_FORE_COLOR | The text in the top bar, both in menu and detail view. | COLOR_BLACK |
| TOP_BACK_COLOR | The background of the top bar, both in menu and detail view. | COLOR_WHITE |
| BOT_FORE_COLOR | The text in the bottom bar, both in menu and detail view. | COLOR_BLACK |
| BOT_BACK_COLOR | The background of the bottom bar, both in menu and detail view. | COLOR_WHITE |
| MEN_FORE_COLOR | The foreground color in the menu. This means that it is the text color in those menu items which are not currently selected, and the background color of the line which currently has the cursor. | COLOR_BLACK |
| MEN_BACK_COLOR | The background color in the menu. This means that it is the background color of those menu items which are not currently selected, and the text color of the line which currently has the cursor. | COLOR_WHITE |
| DET_BACK_COLOR | The background color for detail view. | COLOR_BLACK |
| DET_FIELD_FORE_COLOR | The text color for the field names in detail view. | COLOR_WHITE |
| DET_FIELD_BACK_COLOR | The background color for the field names in detail view. | COLOR_BLACK |
| DET_TXT_FORE_COLOR | The text color for the field values in detail view. | COLOR_WHITE |
| DET_TXT_BACK_COLOR | The background color for the field values in detail view. | COLOR_BLACK |
So find a color scheme you like and put it in your .minlibrc file; it can help make minlib even more of a pleasure to use.
Applications
Most of the files in your library are going to require some application to view. Below find the field strings for configuring these applications, along with a brief description of the file extensions they're expected to open, and the default for each.
| Field | Description | Default |
|---|---|---|
| DEF_PDF_VIEWER | pdf files | xpdf "%s" |
| DEF_EPUB_VIEWER | epub files | fbreader "%s" |
| DEF_HTML_VIEWER | HTML files | w3m "%s" |
| DEF_OGV_VIEWER | Ogg Theora (video) files | vlc "%s" |
| DEF_OGG_VIEWER | Ogg Vorbis, Speex, and Opus (audio) files | ogg123 "%s" |
| DEF_MP3_VIEWER | mp3 (audio) files | mpg123 "%s" |
| DEF_DVI_VIEWER | dvi files; old-school TeX output, rarely encountered in the wild | xdvi "%s" |
| DEF_PS_VIEWER | Postscript files | gs "%s" |
| DEF_OFFICE_VIEWER | "Office suite" files; odt, odf, ods, odp, doc, ppt, xls, docx, pptx, xlsx | libreoffice "%s" |
| DEF_MAIL_SENDER | The command that will be used to email files to others when that is selected | mutt -x -a"%s" -a"%s" |
| DEF_IMG_VIEWER | The command that will be used to view image files; that is, files with extensions .png, .gif, .jpg, .jpeg, .pnm, .tif, .tiff, and .bmp. | feh "%s" |
Note the "%s" in every default string; this is necessary for minlib to determine what exact command to call when you ask it to open something for you. The "%s" will be replaced with the PATH field corresponding to your file type. There can be only one "%s" in your call; but you can use as complex a command line as you like, as long as "%s" is in it.
Make sure that "%s" is in quotation marks; otherwise, spaces in your filename will cause minlib to get very confused.
Note also that DEF_MAIL_SENDER has two "%s"s in it. This is because it attached both the path that you've specified and a temp file which contains all the metadata about that path that minlib knows about. If it makes a difference to your mailer program, the first attachment will be the file itself, the second will be the metadata, so if you only want one attachment, it will be the file.
Other Options
Lastly, we have some options we can use to control minlib's substantive behavior.
| Field | Description | Default |
|---|---|---|
| RECORDFORM | The format that records will have. Can also be specified with the -r option on the command line. Use the formatting codes we will discuss below. | %30t | %24a | %8l | %10g |
| DATAFILE | The file(s) that minlib will use for input data. As with the -f option, multiple files can be specified; just use multiple DATAFILE directives. |
Formatting Strings
Formatting strings is the way minlib refers to customizing the way that it displays your records in the menu view. The examples we've seen so far have been the default, which is defined as the following string:
This probably looks cryptic, at least if you're not familiar with the common Unix method of formatting variable strings; but it's really quite simple, and we'll show you how it works here.
We can translate the above formatting string as follows:
| %30t | Print the first thirty characters of the title, if there is one; otherwise, print thirty spaces |
| | | Print a space, followed by a pipe character ("|"), followed by a space, just as it appears. |
| %24a | Print the first twenty-four characters of the author, if there is one; otherwise, print twenty-four spaces. |
| | | Print a space, followed by a pipe character ("|"), followed by a space, just as it appears. |
| %8l | Print the first eight characters of the language, if there is one; otherwise, print eight spaces. |
| | | Print a space, followed by a pipe character ("|"), followed by a space, just as it appears. |
| %10g | Print the first ten characters of the genre, if there is one; otherwise, print ten spaces. |
This is a very direct, literal translation. Here are the rules for producing it:
- All characters are literal (that is, mean themselves), unless they are part of a sequence that consists of "%", a number, and a single character.
- If you encounter a "%", keep reading characters until you've read a number and a single character.
- Take that single character and match it up with a field in the record. E.g., "t" matches up with "TITLE", "a" with "AUTHOR", and "g" with "GENRE".
- If that field exists in the record, print out the first number characters of it. If it doesn't, print number characters.
- Move on to the next character.
This means that you can format your records with any characters you'd like. If you prefer ">" to "|" for a separator between fields, use that:
If you want to see more of the author and less of the title, put different numbers in:
A few things to remember here:
- There is no limit to the length of formatted strings[*]; however, keep in mind that your formatted strings should fit on the screen. If the length of your formatted strings is longer than your screen, they won't look very good. The default terminal width is eighty (80) characters; the astute reader will notice that the default setting adds up to precisely eighty characters.
- Minlib is Unicode (well, UTF-8) aware, and will print your formatted strings by character, not by byte. (If you don't know what this means, don't worry; it just means that your international characters will appear the way they're supposed to.)
- Unlike many such schemes, the number between the "%" and the character is required. If you leave it out, minlib will just use a 0.
- If you use a character which does not match up to a real field type (e.g., "q"), minlib will simply print spaces.
- If there are multiple fields of that type (e.g., your work has multiple authors, each listed separately with the "AUTHOR" field heading), minlib will use the first for its formatted string.
A lot of how you want to format your records depends on how they are stored, so minlib tries to give you as much flexibility as possible with this. For example, perhaps your authors are stored all as one name, or perhaps with last, first, and middle separately; minlib gives you options for both. Perhaps your records list a "type," perhaps they list a "genre"; minlib provides options for both.
| Sequence | Field Heading | Meaning |
|---|---|---|
| %t | TITLE | The title of the work. |
| %a | AUTHOR, ARTIST | The author of the work. |
| %L | AUTHLAST | Author's last name. |
| %M | AUTHMID | Author's middle name. |
| %F | AUTHFIRST | Author's first name. |
| %k | KEYWORDS | The keywords of the work. |
| %S | SUBJECT | The subject of the work. |
| %p | PUBLISHER | The publisher of the work. Perhaps this would correspond to the studio which produces a film, or the film's producer. |
| %l | LANG, LANGUAGE, LANGONE | The primary language of the work. This may not be the only language. |
| %s | LANGTWO | The secondary language. E.g., perhaps you have a German grammar which is written primarily in English, but still has a substantial amount of German text. German might be the secondary language of that work. |
| %g | GENRE, TYPE | The genre, or type, of the work. E.g., science-fiction, biography, etc. |
| %y | YEAR | Year of the work; whether year of publication, year of authorship, etc. |
| %D | DATE | Date of the work; may simply be a year, but likely something more precise. |
| %m | MEDIUM | The medium of the work; perhaps "book", "film", "magazine", or "journal" would be appropriate values. |
| %P | PLACE, LOCATION | The location, or place, where the work is situated. If the work is in your physical library, perhaps you'd say "shelf" or "storage"; if it's in your digital library, perhaps you'd say "digital", "hard drive", or "disk sleeve". |
| %e | EDITOR | The editor; perhaps of an anthology of short stories, or of a magazine volume. |
| %T | TRANSLATOR, TRANS | The translator of the work. |
| %d | DIRECTOR | The director of the work. Appropriate for movie entries especially, but perhaps also plays which have been publicly performed. |
| %i | ILLUS.OR | The illustrator of the work. Graphic novels as well as children's books might have this as a field. |
| %I | ICONTYPE | A special field, which displays a Unicode string as an "icon" corresponding to a string. By default, there are only thre icons: if the value of this field is "book", then a it will yield the Unicode character 🕮; if "film", then it will yield the Unicode character 🎞; if "music", the Unicode character 𝅘𝅥. Otherwise, it will yield simply '?'. Be aware that some console fonts don't have these characters, so you may not get these symbols; but fonts with reasonably complete Unicode support should work fine. However, if you like, you can define a list of icons in a file in your $HOME/.config/minlib directory, called iconlist. The iconlist file defines an arbitrary list, of arbitrary length, of icons. This file consists of any number of lines, each of which must be a string (which will be the value of the field), a tab, and then the icon in question. For example, we might have the line cooking 🍳 for cookbooks (that is, "cooking", tab, "🍳"); this way, when we define ICONTYPE: cooking, and put %1I in our record format line, we will see the character "🍳" instead of the word "cooking". The last item will always be used for unknown ICONTYPE declarations, so it's probably best to name the last item "unknown" or something similar, and give it a symbol like "?". This can be a great way to introduce some flavor, as well as some instantly-recognizable iconography, into our index. |
Please keep in mind that minlib certainly does not limit the names or types of field that you put in your records; if you want a field in your records called "JABBERWOCK", nothing stops you from using it. Minlib won't be able to include it in your formatted strings; but it will be perfectly happy to store it, display it in detail view, and allow you to search it.
The above table merely lists the possibilities for formatting the strings of your records in menu view; it does not in any way limit the contents of your records.
Minlib will sort your records by the formatted string; practically, this means by the first field.
Getting Printouts and Statistics
While getting detailed statistics on your library files is really a job for a different tool, like awk or Perl, minlib does allow you to gather some information about your database within the program.
The two command-line flags to remember here are -p and -s.
-p tells minlib to print your library listing, rather than open up the TUI and let you browse through it. This is a convenient way to get a printable listing of the contents of your library. For example, here's an excerpt of my personal (physical) library:
Deharbe's Large Catechism      | Joseph  Deharbe          | ENGL     | THEO
Deharbe's Small Catechism      | Joseph  Deharbe          | ENGL     | THEO
Delivered from Evil:  The Saga | Robert  Leckie           | ENGL     | HIST
Democracy in America           | Alexis  de Tocqueville   | ENGL     | PSAE
Dependent Rational Animals:  W | Alasdair  MacIntyre      | ENGL     | PHIL
Dictionary of Ecclesiastical L | Leo F. Stelten           | LATN     | DICT
Dignitatis Humanae             | Paul VI                  | ENGL     | THEO
Dirk Gently's Holistic Detecti | Douglas  Adams           | ENGL     | FICT
Disclosure                     | Michael  Crichton        | ENGL     | FICT
Discourse on Method and Medita | Rene  Descartes          | ENGL     | PHIL
I got this listing by running the following:
$> minlib -f db_file -p
Note that listings produced with -p respect the record format arguments specified in the config file or on the command line.
-s is what produces the statistics; it has no effect at all unless -p has also been requested. It will print a table (after the library printout) showing your total number of records; your tags; how many of each tag it found; and how many of each tag found are unique. For example, the following is the table produced by my personal (physical) library database:
TOTAL RECORDS:		   759
TAGS		NUMBER		UNIQUE
----		------		------
TITLE:		   759		   748
LANGONE:	   759		    10
LANGTWO:	   759		    10
GENRE:		   759		    52
TYPE:		   759		     1
AUTHOR:		   770		   470
COMMENT:	    26		    23
TRANS:		    50		    40
EDITOR:		    29		    29
This was produced by the following command:
$> minlib -f db_file -p -s
These statistics give you the ability to quickly say that, for example, you have 759 volumes written by 470 different authors, 40 of which are in translation (or at least have a named translator), in a total of ten different languages, and so on.
More than this, though, will require that you resort to a real file-analyzing tool. Consider those linked above, or another if you have a different favorite.
Conclusion
Minlib is a powerful, small, fast program that offers a lot of options for managing your library. Enjoy; and please let me know if you can think of any improvements you'd like.
*This isn't technically true; the limit is six hundred and thirty bytes (which, in UTF-8, may or may not match up with characters). But this is far more than you're ever likely to need.